Get DNA-Like Features On Cheap Mods With Arctic Fox Firmware (Tutorial)
Would you like to breathe new life into your old eLeaf/Joyetech/Wismec mods? If you’re looking for a new mod, does something that supports profiles, has great TC, and can be controlled and customized for your PC sound like a good deal for around $30?
If yes, read on to find out how to download, flash, customize, and use ArcticFox on an uber-affordable mod. For this guide, we’ll use it on an Evic Primo 2 by Joyetech. We found this now-mini-DNA-equivalent at a sale for around $20.
What is ArcticFox?
To understand what ArcticFox is, what it does, and why it’s useful, we’ll first have to dispel a myth. To dismantle a lie. Are you ready?
Many devices share the exact same core tech.
The trio of eLeaf, Joyetech, and Wismec, are actually related companies. And they’ve been using the same Nuvoton chip in their mods for years. NFE Team’s members realized this translated to dozens of devices on the market sharing the same tech that was in many ways artificially restricted.
The fine folks at NFE Team realized they could create a “core OS” for those devices, a replacement firmware that would work the same way on all of them. As a bonus, since they use the same chip, they could all have access to the latest and greatest features. And while they were at it, why not borrow some ideas from the best in their field, Evolv, with their DNA chips?
That’s how ArcticFox was born, which you can consider as the Linux equivalent to the customized OS that came with your mod. It’s unofficial, and it will void your device’s warranty, but, at the same time, it will grant it features you’d only find on much pricier YiHi or DNA-based mods.
Most people who say a mod with worthy Temperature Control capabilities would set you back over $100 haven’t tried an iStick Pico with ArcticFox!
Download ArcticFox and NFE Toolbox
You can only use ArcticFox on compatible devices that use the same Nuvoton chipset. Pay a visit to NFE Team’s site and check out the list at the bottom of the home page to see if ArcticFox is compatible with your device.
Here’s the point where we should stress that this is an unsupported and unofficial piece of software for your device. Flashing it will void your warranty. For the same legal reasons 18650 cells come with warnings, we have to mention that we don’t condone the use of ArcticFox. Nor are we responsible if something goes awry.
Open both “Download NFE Tools” and “Download ArcticFox” in two new tabs, for you’ll need both. Visit the latest thread for each. At the time of writing, it’s this for NFE Tools and this for ArcticFox. Download and unzip both files to the same folder on your PC.
Connect & Flash Mod
Connect your device to your PC using the USB cable it came with. Note that some USB cables only transfer power instead of data and won’t work. If your computer doesn’t detect your device, try a different cable.
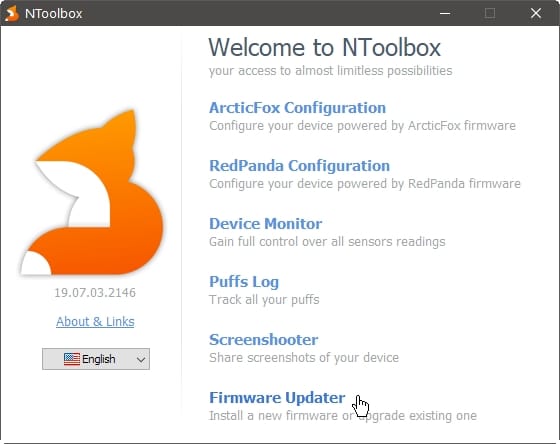
Run NToolbox.exe and choose the last option, Firmware Updater. Ensure that the program detected your device correctly by checking the details at the top of the window. You should see the device’s name, but also its firmware, hardware revision, and boot mode.
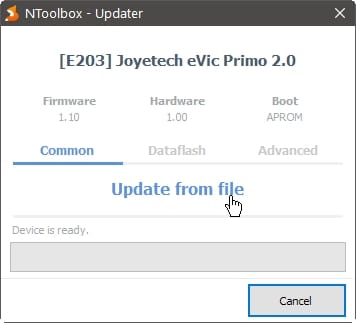
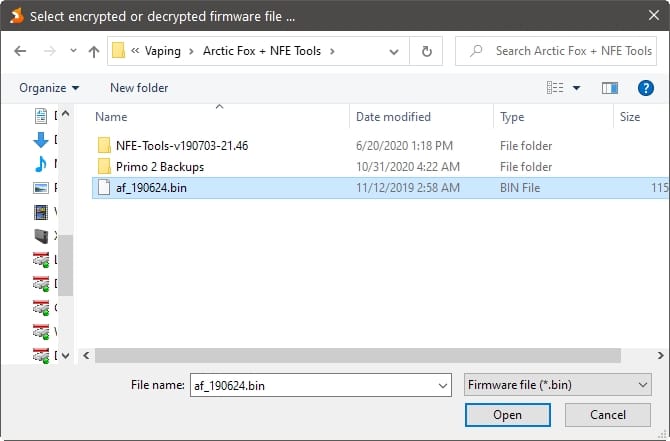
Click on “Update from file” and choose the ArcticFox firmware you unzipped earlier. After selecting the file, NToolbox will start the updating process, replacing your device’s original firmware with ArcticFox.
I suggest you don’t perform the process with cells inside your mod. However, I haven’t personally met a problem flashing over a dozen devices, with or without cells. Also, try to minimize any chance of the process being interrupted. That could end with an unusable (“bricked”) device. Terminate any running software and non-essential background processes, and make sure you don’t unplug the cable during the flashing.
If all goes well, a message will inform you ArcticFox was successfully installed.
Set It Up
ArcticFox doesn’t work in the same way as the original firmware. Thus, you’ll have to spend some time to familiarize yourself with it. In many ways, it will feel as if you just got a brand new mod.
It’s better to invest some more time, though, to customize the device to work precisely how you want. Although you can do it directly on the device, it’s easier to perform all your tweaks through the NFE Toolbox from the comfort of your PC’s large screen, keyboard, and mouse.
In this guide, we’ll almost entirely skip tweaking the mod on its own, which ends up more complicated due to the small screen and button combos. We’ll rely solely on the NFE Toolbox, running on a PC with Windows 10. If you’re on a different platform, where NFE Toolbox isn’t available, maybe you’d be able to use it through some virtualization solution, like VMWare, Virtualbox, or Parallel’s Desktop.
We’re starting from the point where NFE Toolbox is running on our computer, and a mod with ArcticFox is connected and properly-recognized through USB. If you’ve just flashed your mod to ArcticFox, you can leave it connected and proceed to the next steps to customize it.
Set Up Profiles
ArcticFox supports different profiles for your atomizers. Many people use a single atomizer on their mod as their all-day, every-day setup. Some, though, and especially those who treat vaping as a hobby, may turn to different atomizers throughout the day. A Kayfun for MTL vaping at work breaks through the day, a CSMNT for huge clouds when back home in the evening.
Different atomizers and coils also demand appropriate settings, so, when swapping between them, you have to re-adjust your mod. It’s even more annoying when using coils made of different materials in each atomizer. You have to swap from Wattage to Temperature control mode, then re-input your desired values for Temperature and Power if your mod didn’t store them. That’s where profiles help.
Profile support in mods, and ArcticFox, allows you to define different settings for each atomizer. Then, instead of re-adjusting a bunch of values, simply swap the profile.
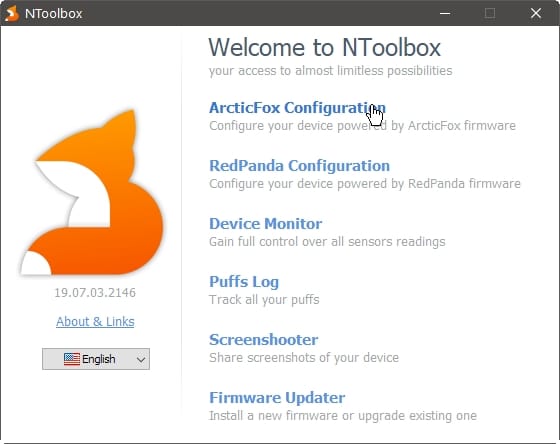
Let’s see how you can set up two profiles for two different atomizers. Start by connecting your first atomizer to your mod. Then, choose “ArcticFox Configuration” from NFE Toolbox’s initial screen.
One of the profiles will already be active. It will be pre-populated with either default values or the ones you’ve inputted if you used the mod on its own after flashing ArcticFox. Let’s suppose that your first atomizer has a Kanthal build, used in typical power mode, and define the profile for it.
Name: Enter the name for your atomizer – or the build, or anything you fancy that fits in the restricted space.
Power is the most essential setting; the power level/Wattage that will reach your coil. You can define the value here if you know what Wattage you like for the specific build. Or if using pre-made coils which come rated for a particular power range.
If not, feel free to set it to 10.0 W, and then adjust upwards on the mod when you’re vaping on your build to find your sweet spot.
Power Step allows you to choose how quickly the mod will go through Wattage numbers when adjusting on the device.
With small coils in Mouth To Lung setups, it makes sense to have this at 0.1W. A 0.5W change can make all the difference in the world between a cold and hot vape in such cases.
With large coils for Direct Lung setups, even 5W or 10W might not make a difference. For demanding builds, it makes more sense to swap the step to 1W.
Preheat Type & Time: Preheat applies more power when you first hit the fire button on your mod to decrease the time needed to heat large coils. You can choose between Absolute, Relative, and Curve.
With Absolute, you can input a specific Wattage. For example, if you like how your coil vapes at 50W, but it takes two or three seconds to get to that point, you might use a preheat of 60W – 75W for half a second to eliminate the initial wait. You shouldn’t overdo it, though, for too much power can overheat your coils, scorch your wicks, and is harder on your cells.
With Relative, you can input a percentage, making the option a better choice for those who like to adjust their power level through the day. By using a percentage, like, for example, 10%, when using your mod at 50W, it will first “throw” 55W at your coil for the preheat’s duration. If you were vaping at 100W, it would start from 110W.
Curves are more versatile in that they allow you to define multiple power points for the time of your puff. This way, you can start at 70W for your DL coil to heat quickly. Then, drop to 50W for 2 seconds to keep the temperature at your desired level. Finally, dive again, to 20W for the rest of the puff, for a cool end. You can use one out of eight predefined curves. You can also choose one (from the pull-down menu) and edit it (from the button that pops-up to the right) to match the way you prefer to vape.
If you go for an absolute or relative preheat instead of a curve, you’ll also have to define its duration. With curves, you define multiple power points throughout the puff’s time. With absolute and relative preheat, you only set an initial duration where the preheat’s power will be applied before power levels return to your standard setting.
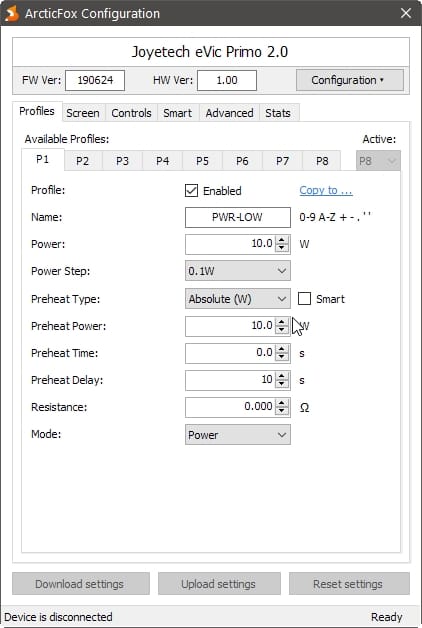
Preheat Delay allows you to define an amount of time during which a preheat won’t be re-applied on your coil. When chain-vaping, you don’t want preheat’s higher Wattage applied again and again on your coil – if you would, you’d set it as your main Wattage. Instead, you want it once, in the beginning, “to get your coil up to speed,” so to speak. Thus, that’s what this value’s all about: the time you expect your coil needs to cool down after a short vaping session.
Resistance doesn’t need much explanation – the number in this field is the Ohm reading of your coil setup.
Finally, that’s not a real “finally,” for the Mode pull-down menu offers access to some more values. For now, we consider you’ve set-up your first atomizer, with Kanthal or Ni80 coils, for use in power mode. Now’s the time to “save” the tweaks before checking how you can set-up Temperature Control in ArcticFox.
Everything you changed up to now isn’t actually “saved” in your mod, but only “locally” on your PC. To apply your tweaks to your first profile, click on “Upload settings” at the bottom of the window.
Disconnect your atomizer, connect one with a TC-compatible coil, and let’s create a second profile for that.
Usually, your ArcticFox-equipped mod will detect the atomizer’s change and ask you if you want to switch profiles. Do so, and then click on “Download settings” in NFE Toolbox to “pull” the mod’s new profile values. This way, we also “pull” the Ohm reading of the atomizer, which is crucial for a good TC experience.
Go through all the steps we saw for power mode. When you reach the Mode pull-down menu, in the end, change it to Temp Control, and you’ll see some extra options popping-up.
Start by locking the Resistance by ticking the newly appeared box with the lock icon. Choose your Coil Material from the next pull-down menu – make sure to select the correct type of metal. Enter your desired Temperature in the following Temperature field. If you’re unsure, set a safe value, like 300°F, and re-adjust on the device itself when vaping.
Like the Power Step option, Temperature Step is the same, but for the Temperature value. The 5°C/10°F setting is for most people, who probably don’t find much of a difference when vaping at 350°F or 360°F. The 1°C/2°F is for the connoisseurs among us who do and would prefer more granular control.
The Temperature Dominant at the very end allows you to choose which value you’d like to have as the primary one in this profile: the Temperature or the Wattage. Enabling the setting and prioritizing Temperature probably makes more sense, since in TC modes the device regulates the power automatically.
If you want to keep your mod’s use simple, and you don’t plan on using all eight profiles, you can disable the ones you don’t need by un-ticking “Enabled” at the very top. The option’s available only for the non-active profiles on the device.
Also, notice the “Copy to…” at the top right. This allows you to clone your currently selected profile to another slot. It’s useful if you want to experiment with somewhat different values on the same atomizer or create similar profiles for different setups.
We feel we should repeat that whatever changes you make won’t be applied to your mod until you hit “Upload settings.” If you don’t and absent-mindedly terminate NFE Toolbox, you will lose all your tweaks.
We believe that the Profiles are the most significant feature of ArcticFox, so we won’t linger much on the rest of the settings.
Configure Screen & Looks
With your Profiles set-up, you can move to the Screen group of options, from where you can customize how your mod’s new menu will look and work.
Settings
The first tab of options allows you to adjust your mod’s screen Brightness and some Idle Time values, which define how long the screen will stay on after vaping.
The “plain” Idle Time setting is the time after a vaping session. The Locked one is for when the device is woken temporarily from a locked state. Charging will activate when the device is connected to a charger or your computer’s USB (if you haven’t disabled USB charging).
By default, ArcticFox presents each puff’s duration on a line of the screen that, when idle, shows different information. For example, the last line on your screen might present the current Amp draw on your cells. While vaping, this will be replaced by the time of your puff. After a while, it will revert to its normal state. You can adjust how long your latest puff duration will remain on the screen from the Puff Screen Delay option.
You probably don’t want to enable the Flipped option – which rotates the screen 180° – on devices with a vertical menu, like the VTC Mini. Still, you might prefer the alternate orientation on something like an iStick Pico.
Appearance
As its title states, the Appearance tab holds a group of options that allow you to change how your mod’s new menu will look. From the Main Screen Skin, you can choose one out of three skins. For anyone interested, I use the Classic skin. It’s closer to the original menu’s looks and easier on my failing eyesight.
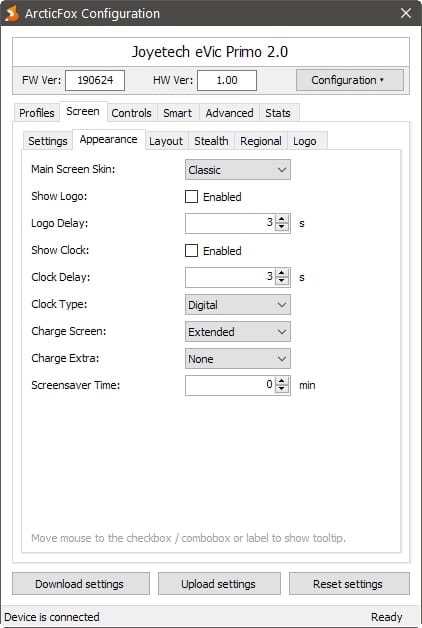
You can have your mod display your name, or any low-res image you desire, by enabling Show Logo. Adjust the Logo Delay, directly below, to choose how long it will stay on the screen. You can define this text or image from the Logo tab, which we’ll see in a while.
Similarly, Show Clock and Clock Delay will display a clock for the amount of time you define. You can choose if you prefer an analog or digital clock from the next pull-down menu.
The Charge Screen and Charge Extra settings that follow define what will be displayed on-screen when the device is charging. Finally, the Screensaver Time is where you can extend the device’s idle time for X minutes to show a screensaver – a clock, logo, etc.
Layout
Initially, the options under Layout look even more complicated since they’re split into three separate sub-tabs. However, it’s only a matter of choosing what you’d like to see on your device’s screen.
Each tab refers to one of the different skins we saw before, which mutate how your mod looks. So, you don’t have to customize all of them, only the one you’re using – Classic, Foxy, or Circle Screen.
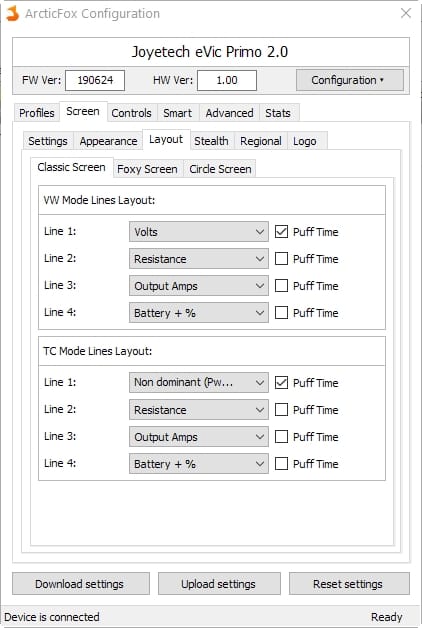
Depending on the skin you’re customizing, you’ll have two groups of either three or four pull-down menus. Each pull-down menu defines what will appear in each respective extra line of information on the mod’s screen. The first group is for the device’s power modes, the second one for the Temperature Control modes.
Feel free to customize them however you wish, to display the information you prefer at the spot you like. Notice that you can also enable Puff Time next to one of them for both the Power and Temperature Control layouts. This allows you to choose where you want the puff timer to appear when vaping.
Stealth
You probably won’t need much help customizing the options under Stealth, for there are only three.
Stealth Mode will keep your device’s screen off, turning it on temporarily only when adjusting or using it. On some mods, not even then, until you manually exit stealth using a key combination.
If you don’t enable Show Charging, the device’s screen will stay off while it’s charging. If you do, it will stay on and show the state of the charging process.
Remember how you could define how long a Screensaver would remain on the screen? Show Screensaver is where you enable or disable that functionality.
Regional
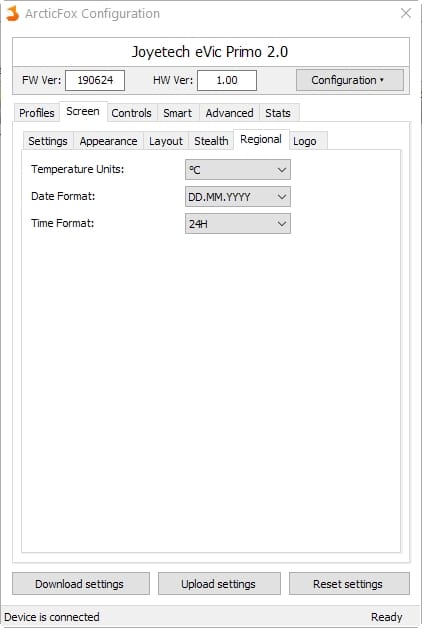
We don’t use the same temperature units, date, and time formats around the globe. That’s why the options under the Regional tab allow you to choose the ones you prefer.
Logo
Choose Logo File in the Logo tab allows you to import an image to display on your mod’s screen. You don’t have to convert the pictures yourself; the program will take care of that automatically.
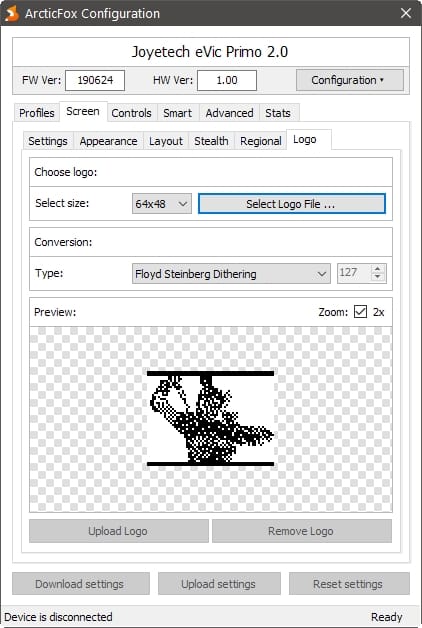
Depending on the image you use, you might want to check out if the results look better with Floyd Steinberg Dithering instead of Threshold Based as your Conversion Type.
When you’re happy with the results, click on Upload Logo to send the image to your mod.
Customize The Controls
The Controls tab houses four more tabs, from which you can set up button “shortcuts.” Those can be either multi-clicks, for example, pressing the Fire button three times in under a second, or button combinations, like keeping the Fire and the Up buttons pressed for over a second.
Settings
You’ll only find two options in the Settings sub-tab. If you enable the first one, +/- wake up, your device will wake up from a sleep state if you press any button. If you disable it, your mod will wake up only if you press the Fire button.
The +/- behavior pull-down menu allows you to swap the two buttons if you don’t like their default orientation (Down on the left button, Up on the right one).
Multi Clicks
From Multi Clicks, you can map useful functions to multiple clicks of the fire button. As before, you have two different groups, for power and TC modes. Inside them, you’ll find three pull-down menus, from where you can assign what two, three, or four clicks of the fire button will do.
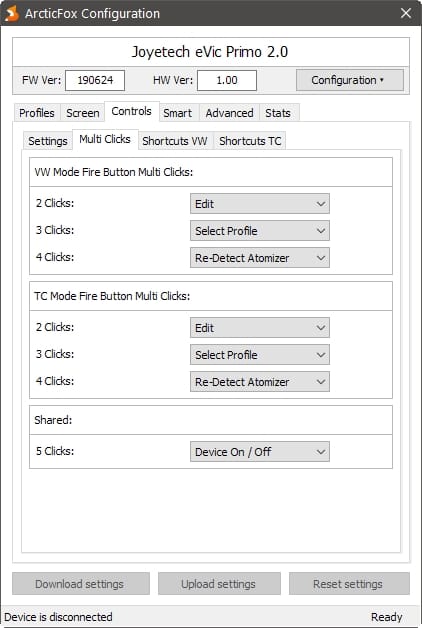
There are more than a dozen different actions and not enough buttons to map them to, so you’ll have to prioritize what’s essential for you. I always map Edit to two clicks to quickly adjust anything displayed on the screen. This brings locking the Resistance and adjusting Wattage in TC modes a click away. Since I also use multiple atomizers throughout the day, I have Select Profile mapped to three clicks. Thanks to that, I can jump between different settings quickly.
Shortcuts VW & TC
The Shortcuts VW and Shortcuts TC tabs are identical and similar to the Multi Clicks section. In each tab, you’ll find the same set of options, which allow you to map different functions to button combinations.
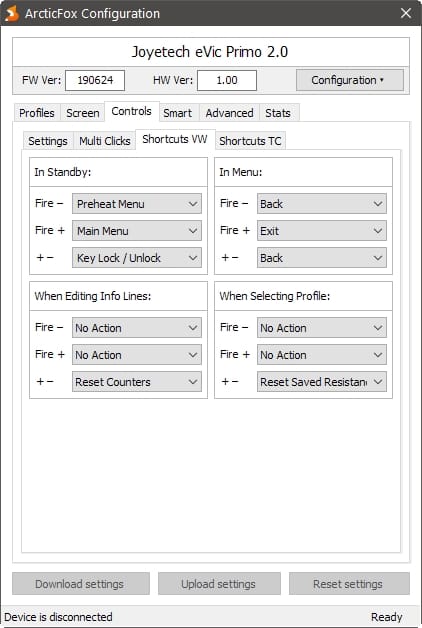
We won’t go into detail on how to customize them. The process is the same as the Multi Clicks section and, again, a matter of personal preference. However, we’ll have to explain why there are four groups of pull-down menus. Those are:
- In Standby
- In Menu
- When Editing Info Lines
- When Selecting Profile
The first one allows you to define what the button combinations will do when the device is in standby mode. You can map anything you wish here, but if you haven’t mapped it to a multi-click combo, make sure to map access to the Main Menu of ArcticFox somewhere.
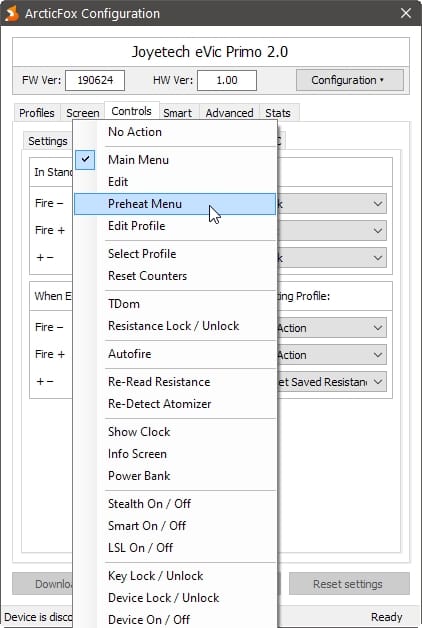
After that, the rest of the groups are much more specialized. Each allows you to define what each button will do when in a specific “screen” of ArcticFox.
In Menu is where you choose what each combo will do when you’re accessing the device’s main menu. Each combo can be disabled, move you to the previous level, or exit the menu altogether.
The aptly named “When Editing Info Lines” is where you choose if the selected value will reset when pressing a button combination. That’s the only available function for that state.
The last group is the similarly self-explanatory When Selecting Profile, which also offers a single option for a particular screen. You can map to a button combination the ability to reset the stored Resistance in the selected profile. This will force your mod to re-read your current atomizer’s Resistance.
Tweak The Smart Mode
If enabled, ArcticFox’s Smart Mode can automatically swap between profiles based on the atomizer’s resistance reading.
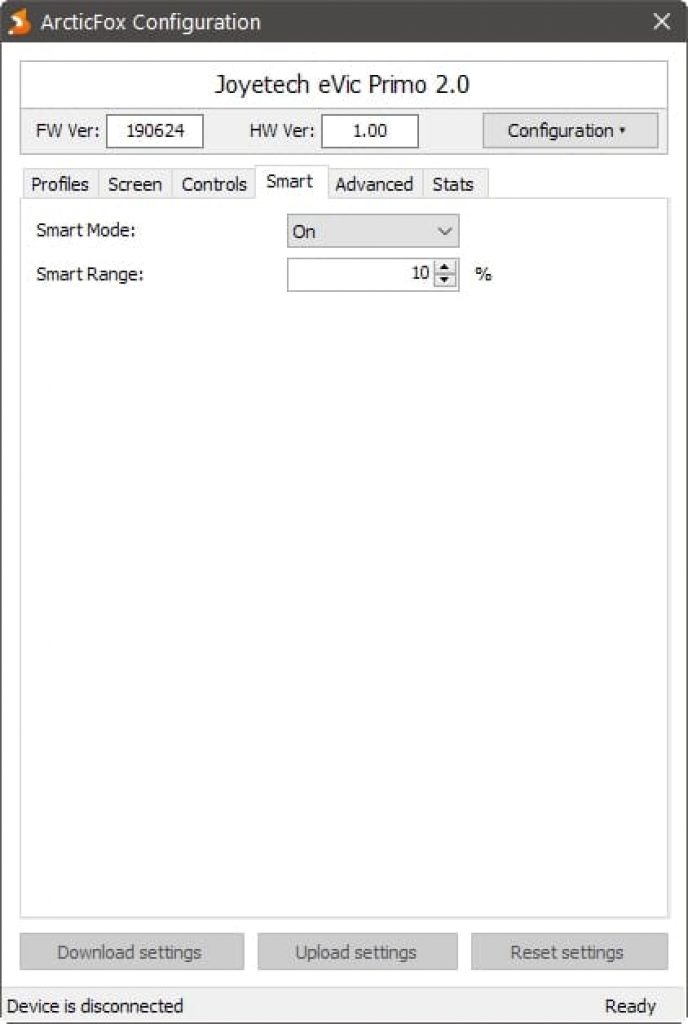
For example, you might be vaping on a Mouth To Lung atomizer with a 1.2Ohm resistance during the day and sub-ohming at home with a 0.2Ohm dual coil RDA when back at home.
Such a difference in resistance isn’t expected on the same coil setup, and ArcticFox is smart enough to realize that. Then, deduce that it’s because you’ve probably swapped atomizers, and auto-select the profile with the closest resistance to the latest reading.
Apart from turning the feature on or off, you can also set a percentage range within which any resistance change will be considered normal. It’s quite normal for a 0.27Ohm coil to read 0.28Ohm or even 0.24Ohm for many reasons: the wick might have moved after refilling the atomizer. Your coil might have a hotspot. One of the coil legs not be tightened down enough, etc. The larger the percentage range, the wider the allowed difference between the resistance readings treated as the same coil setup.
Advanced Settings
We don’t suggest you change most of the settings you’ll find in the Advanced tab since some of them might be even dangerous – and push your cells over their limits. The defaults are safe, and tweaking them won’t change how you use your mod.
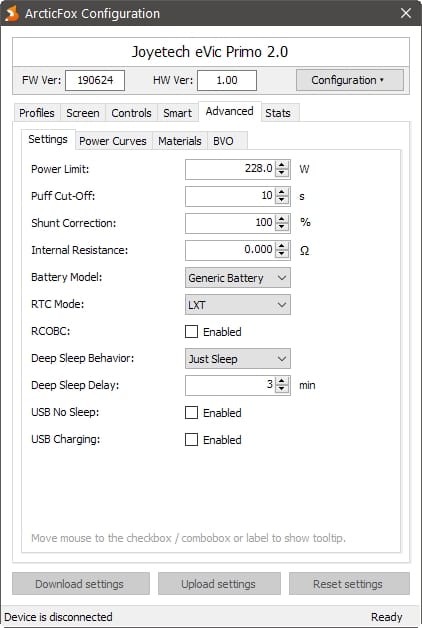
We suggest you skip all settings in the Settings sub-tab. Since I’m not a fan of USB charging and always use an external charger for my cells, I always disable the USB Charging function. Don’t touch the rest of the options, especially anything related to your cells, like the Max Charging Current.
We talked about how Power Curves work when we saw how you could customize your Profiles. Under the Advanced tab, you can find a sub-tab where you can tweak those Power Curves. You can do this as we saw earlier, with the only difference being that you can jump between curves more quickly through this window. In contrast, in Profiles, you select them one by one from a menu.
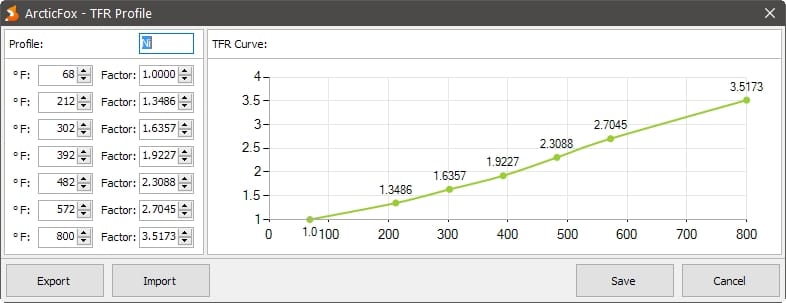
In the Materials sub-tab, you’ll find the TFR values for the different Temperature Control – compatible metals supported by ArcticFox. The default values work perfectly for us, but if you’d like to customize them, that’s where you do it. When customizing a TFR curve, the interface is almost identical to Power Curves. The difference here is that you can also export and import your curves. That’s useful if you want to use the same values in different mods or bring in tweaked ones from the popular Steam Engine site or other vapers.
The BVO tab is another option that you should leave alone. You see, BVO refers to Battery Voltage Offset and exists so you can manually dial in the voltage of your cells for when the mod doesn’t read them properly.
To do that, though, if you’re using ArcticFox in a dual-cell mod, you’d have to always use the same cells in the same position in the battery tray and never change them. You should have checked them with an external charger and a multimeter. You should be absolutely sure you know each cell’s capabilities, maximum and minimum charge.
We believe that 99.9% of vapers don’t care or want to invest the time for that. At worst, it only means accepting 1% to 3% worse battery life by not fully taking advantage of your cell’s capacity. Thus, they shouldn’t touch those settings, which could push a cell over its limits.
Count Your Puffs
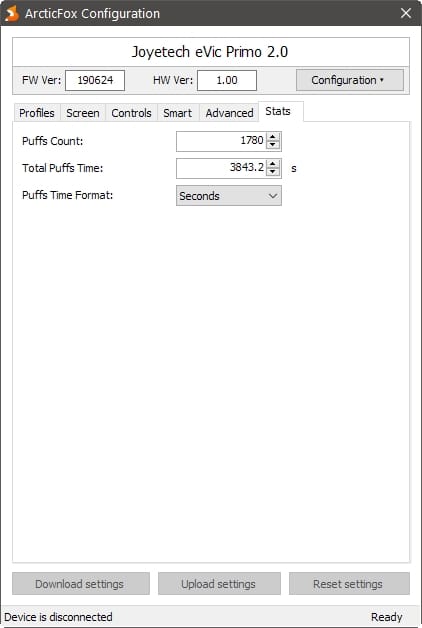
The last tab leaves behind advanced terminology and is another simple affair. That’s where you can zero the mod’s puffs counters. There are two of them, counting the number and total time of your puffs, and a pull-down menu from where you can choose if you want to see the time in seconds or full hour format.
Managing Configurations
After setting everything up and uploading your new configuration to your mod, it’s also worth exporting your configuration as a file on your PC. This is especially useful if you have more than one device running ArcticFox, like yours truly.
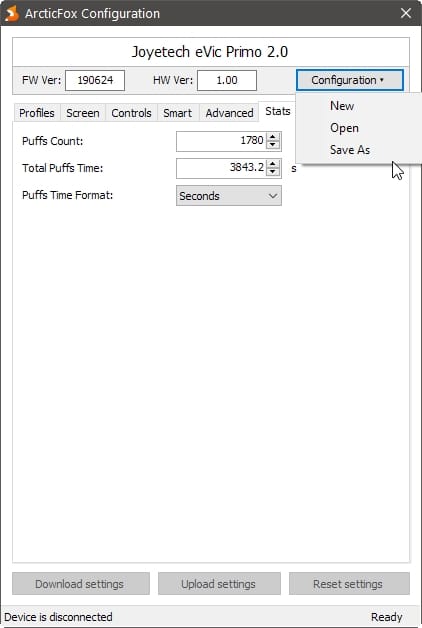
I set up the configuration with multiple profiles on one of my mods, then export and upload it to the rest. This way, my whole fleet of ArcticFox-compatible devices perform in precisely the same way.
You can do this from the menu at the top right of the window. From there, you can reset the current configuration (New Configuration), load one you saved before (Open), or export the current one (Save As).
Monitor Your Device
The NFE Toolbox and ArcticFox combination offer another feature you can only find in top-tier and expensive mods: real-time monitoring.
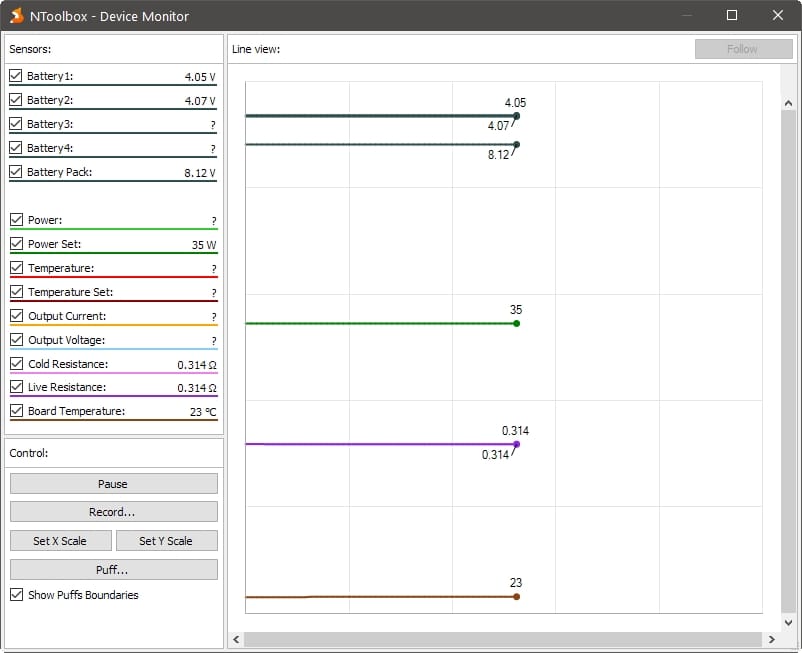
Run NFE Toolbox, but instead of entering the ArcticFox Configuration, click on Device Monitor with your device connected. A new window will pop-up, showing you graphs of your device’s state in real-time. Among them, you’ll see your cells’ voltage, the resistance reading, and so on. Now, if you take a puff without disconnecting your device, you’ll be able to see those values changing as you’re using it.
By being able to monitor your device in real-time, you can troubleshoot Temperature Control builds on mods with lesser hardware, where there can be some wattage “overshoot.” That happens when the mod doesn’t throttle the power quickly enough, so it ends up heating the coils more than it should.
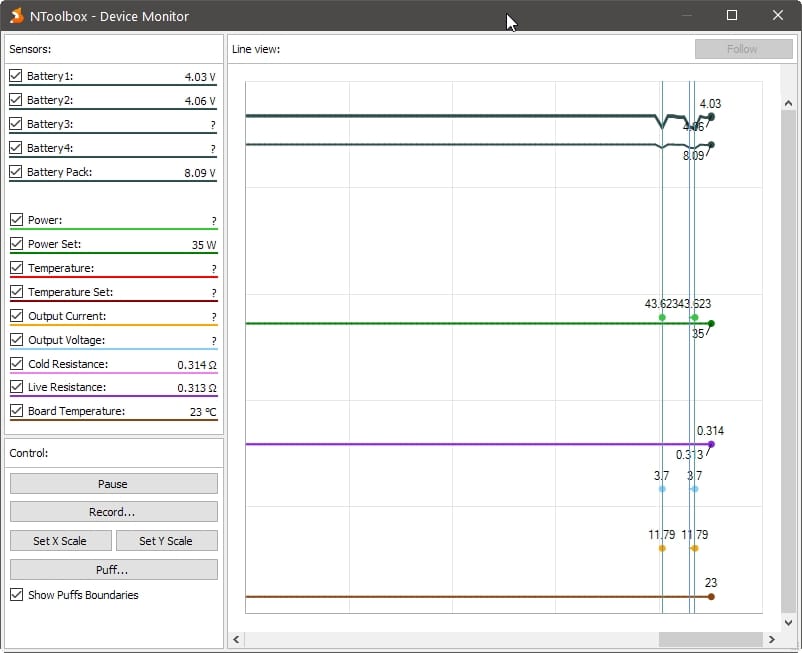
You can also check out how low your cells’ power level drops when in use (known as “sag”). The older and lower quality cells you’re using, the higher the sag. If, when in use, the power level drops under 3.2V, most mods will complain you’ve got a low charge. The higher the Wattage you’ve vaping at, the more apparent the impact of sag. Sag problems usually mean one of two things. Either the cells you’re using are old and have lost capacity, or they’re underpowered for your style of vaping / power levels.
Plus, it’s cool watching the temperature and wattage rise and fall in real-time while inhaling your home-made strawberry vanilla-chocolate mix.
Outro
Phew, it was a lot, but we believe it was worth it. With ArcticFox, you can turn a twenty-buck mod that gave you a sub-par vaping experience into a little vape-wonder that can offer you precisely the vape you crave. Hand-crafted and fine-tuned, with power and temperature curves, smart level regain, and easily accessible button combinations, by you, for you.
Let us put it like this: after using ArcticFox, there’s no turning back. It makes all mid-tier mods look severely limited and splits the vaping world into three groups. The top-tier mods that already do what ArcticFox does, but cost a lot. Then, the ArcticFox-compatible mods at cheap-to-mid-level prices. And after those two groups, well… all the rest. “The rest” that even if they cost twice as much as your ArcticFox-compatible mod, they’ll lack the full functionality of a DNA/YiHi/ArcticFox mod.
Yes, it’s that good.
Of course, it’s up to you if you want to play your chances and flash it on your mod. We can’t make that decision for you, for a botched procedure could render your device unusable. As far as we know, there also hasn’t ever been a documented case of a device malfunctioning because of ArcticFox. Still, we’re neither affiliated with its developers nor have anything to gain by convincing you to use it. You should keep in mind it’s unofficial code, and there are no guarantees, by anyone, it will work as it should.
As I said, I’m personally using it on all my ArcticFox-compatible devices. I never had a problem with any of them, and I find all my other devices lack compared to them. I find myself gravitating towards using a cheap Evic Primo instead of my Protons, Gens, and Legends, because of ArcticFox’s ease of use, relatively stable TC, and customizability. Take that as you will.
Odysseas Kourafalos
The first time I tried to vape, I found myself trying to make sense of an Aspire Atlantis and an entry-level iStick 30W, and failing. Two months later, I was vaping on a Sigelei 150W TC, rolling my own coils, mixing my own juices. In less than a year I was trying to help others do the same at them Reddits, writing mega-guides on the topic while being quite vocal on what was great and what sucked in the world of vaping. Hint: most things sucked. They still do.


Thanks for the clear instructions! I was worried about bricking my device, but following your guide made the process a breeze. The Arctic Fox firmware really is a game-changer – the improved performance and aesthetics are amazing. Keep up the great work!